

Installing Android on Virtual Machine has become a very straight forward process. This guide will use the recently released Android-x86 4.0 and Android-x86 2.3 Live CDs. They will be running on Virtual Box, a free software released by Oracle for virtualization.
For those of you new to Virtual Machines, what this software does is emulates a PC inside a PC. Confused? Think of it like inception, except for the PC. It does this by isolating a small chunk of your computer then uses that chunk to run another computer. What you do in the Virtual Machine can completely be isolated from the host machine.
How To Install Android on a Virtual Machine
Step 1: Download&Install Virtual Box
Step 2: Download the Android image of your choice(if you are unsure, download the eepc builds.)
Notes:
- I have gotten internet, network, and sound to work on eeepc builds 2.2 out of the box.
- You may need to follow the optional steps after this tutorial for network for some images. If you download/install the wrong image for your PC, the commands will say "interface not recognized or not found".
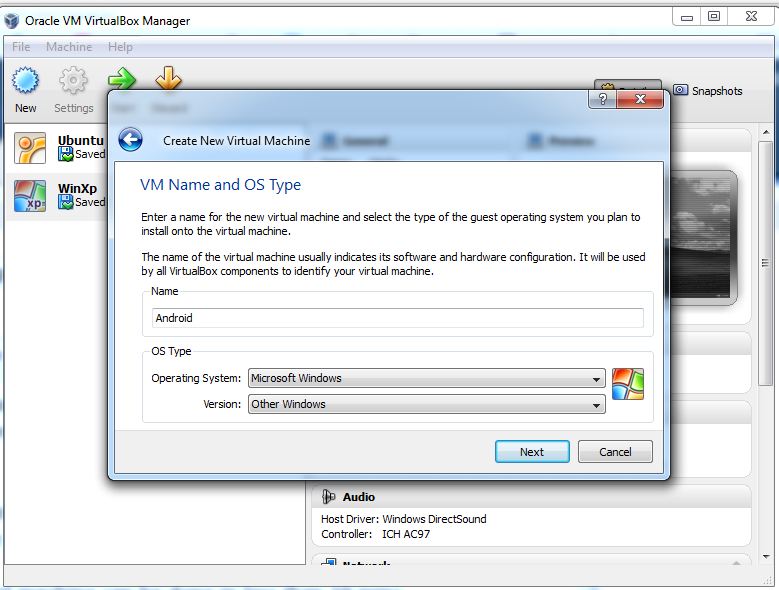
Step 3: Open Virtual Box and press (Ctrl+N)
Step 4: Type in a name for the machine and "Other version" as other windows option
 Step 5: Click Next and then Next for "Dynamically Expanding Storage"
 Step 7: Select the size of the disk(You really don't need that much space, about like 400-500 MB). Hit Next.
 Step 8: Now that is done(you just created virtual storage space and the virtual machine), select the machine and press the green "Start" button.
Note: You can move cursor out of the VM by pressing right Ctrl at anytime
 Optional For Network/Sound: Right Click on Android and go into Settings. Change the following -
- OS Type: Linux
- Sound device: change to Sound Blaster 16. ICH AC97 will not work. (if you have a solution, let us know)
- Network device: PCnet-Fast III, attached to NAT. You can also use bridged adapter, but you need a DHCP server in your environment.
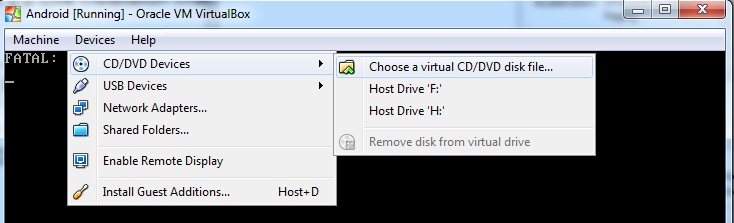
Step 9: In the new running Window of the machine: Press Devices => CD/DVD Devices => Choose a Virtual CD/DVD Disk File. Select the Android Image you downloaded and press Open.
 Step 10: In the same Window click on Machine => Reset
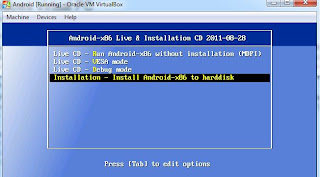
 Step 11: When the machine reboots, you should see the Window below. Select "Option 4: Installation Install Android to Harddisk".
Note: Stop here if you don't want to install and use Android directly off of the image. Select option 1: Run Android-x86 without Installation.
 Step 12: Select Create/Modify Partition in the next window screen. Press Enter.
Step 13: On the cfdisk Window, use the left arrow key to select New. Press Enter until you see the screen below.
 Step 14: In the "diskdrive" window, Select Bootable and press Enter. Then select Write and press Enter. You Should see "Boot" under "Flags".
 Step 15: Press Yes for prompt to overwrite
Step 16: Press Quit. This should bring you back to the blue screen
Step 17: Select the new Disk Drive you just create, press Enter, then click format as Ext3.
Step 18: Press Yes/OK/Enter to the rest of the prompts.
Step 19: Press Enter on "Run Android"
Step 20: Done - remember to unmount the disc in "Devices" for your VirtualBox

*Optional Steps*
Setting up the Network/Internet for Android 3.2 x86 Images:
1) Make sure you have NAT and PCNetfast setup(step 8 above) for your network adapters. Press ALT+F1 to open terminal.
2) Type - dhcpcd

3) Type - setprop net.dns1
e.g. setprop net.dns1 75.3.76.123
Note: If you do not know the dns address go into command prompt(press WinKey+r and type in "cmd.exe") in one of your Windows PC. Then type in "ipconfig /all" and look for "DNS Servers" at the top.
4) Done - Press ALT+F7 to exit
Sending and installing apk files(applications) to Android x86:
1) Make sure you have network setup correctly
2) Press ALT+F1 to go into terminal
3) Type - wget "URL location of file".
e.g. wget ftp://192.168.0.102/helloworld.apk
Note: You can ftp to host the apk, or your can upload the apk to a webserver online.
4) Press ALT+F7 to exit
Installing Android on Virtual Machine has become a very straight forward process. This guide will use the recently released Android-x86 4.0 and Android-x86 2.3 Live CDs. They will be running on Virtual Box, a free software released by Oracle for virtualization.
For those of you new to Virtual Machines, what this software does is emulates a PC inside a PC. Confused? Think of it like inception, except for the PC. It does this by isolating a small chunk of your computer then uses that chunk to run another computer. What you do in the Virtual Machine can completely be isolated from the host machine.
How To Install Android on a Virtual Machine
Step 1: Download&Install Virtual Box
Step 2: Download the Android image of your choice(if you are unsure, download the eepc builds.)
Notes:
- I have gotten internet, network, and sound to work on eeepc builds 2.2 out of the box.
- You may need to follow the optional steps after this tutorial for network for some images. If you download/install the wrong image for your PC, the commands will say "interface not recognized or not found".
Step 3: Open Virtual Box and press (Ctrl+N)
Step 4: Type in a name for the machine and "Other version" as other windows option


Note: You can move cursor out of the VM by pressing right Ctrl at anytime
- OS Type: Linux
- Sound device: change to Sound Blaster 16. ICH AC97 will not work. (if you have a solution, let us know)
- Network device: PCnet-Fast III, attached to NAT. You can also use bridged adapter, but you need a DHCP server in your environment.
Step 9: In the new running Window of the machine: Press Devices => CD/DVD Devices => Choose a Virtual CD/DVD Disk File. Select the Android Image you downloaded and press Open.

Note: Stop here if you don't want to install and use Android directly off of the image. Select option 1: Run Android-x86 without Installation.

Step 13: On the cfdisk Window, use the left arrow key to select New. Press Enter until you see the screen below.


Step 16: Press Quit. This should bring you back to the blue screen
Step 17: Select the new Disk Drive you just create, press Enter, then click format as Ext3.
Step 18: Press Yes/OK/Enter to the rest of the prompts.
Step 19: Press Enter on "Run Android"
Step 20: Done - remember to unmount the disc in "Devices" for your VirtualBox

Setting up the Network/Internet for Android 3.2 x86 Images:
1) Make sure you have NAT and PCNetfast setup(step 8 above) for your network adapters. Press ALT+F1 to open terminal.
2) Type - dhcpcd

3) Type - setprop net.dns1
e.g. setprop net.dns1 75.3.76.123
Note: If you do not know the dns address go into command prompt(press WinKey+r and type in "cmd.exe") in one of your Windows PC. Then type in "ipconfig /all" and look for "DNS Servers" at the top.
4) Done - Press ALT+F7 to exit
Sending and installing apk files(applications) to Android x86:
1) Make sure you have network setup correctly
2) Press ALT+F1 to go into terminal
3) Type - wget "URL location of file".
e.g. wget ftp://192.168.0.102/helloworld.apk
Note: You can ftp to host the apk, or your can upload the apk to a webserver online.
4) Press ALT+F7 to exit


16 comments:
"Step 1: Download&Install Virtual PC"
but on screenshots there is VirtualBox (Oracle/Sun/innotek)
I had created a virtual PC guide earlier and forgot to update. Thanks for pointing it out.
does it also work on vmware? i've tried it but im stuck on the boot, there i got a WARNING: An unknown tablet.
@Rising staR
I tried 2.2 on vmware workstation, worked fine. Havn't tested it out on the newer ones. Get virtual box... its easy to use, free, and works perfectly(which was why I switched from virtual PC).
@Tony Le
What android version did you use in you sample on this blog? is that honeycomb? i'l try the 2.2. Thanks
@Rising staR
3.2 Honeycomb. It's crazy fast.
I got "Unknown Tablet" on Virtual Box. Also I can't install, it cannot mount my HDD (Cannot mount /dev/sda1 Do you want to format it?)
I can't format it, it doesn't work, drops back to the format screen, and I get this error again, and the same happens.
I used latest Virtual Box, and latest X86 Android ISO (android-x86-3.2-RC1-tegav2.iso)
@Adam
I also get the unknown tablet but it boots up fine.
Here is the config I have on my system.
win7 64bit vbox 4.0.2 - http://hq-files.com/102443-VirtualBox%204.0.2%20r69518%20Final.rar.html
android 3.2 rc1.iso
Others that may help:
Android SDK
Admin Access(right click->run as administrator)
is there a way to enable internet service on this vm?
The only way to enable the internet I found was to load it on a physical computer that has a support wifi I did on a dell latitude e6510
i can't use the internet on android 3.2 when i installed it using windows virtual pc
So this is the way to use android as the OS of your pc? and with the support of keyboard?
@foumfo
Yes, if you set it up correctly.
@Tony Le Same problem but it doesn't seem like anyone else cares about fixing it... lol
I've run Android 4.0 via VirtualBox, without installation (option #1). But it seams that there is no sound in the virtual environment. I need sound in this virtual Android, because I want to test its accessibility, and specially the screen reader "Talkback", witch requires audio to output its speech. Is this possible at all in such conditions? I'm running Windows 7 32-bit, a Realtek HD Audio (ALC268) and VirtualBox v4.1.4. Please help!
@Kostadin Kolev
I couldn't get Network nor sound to work in 3.2 or 4.0. Network does work with 2.2 using the eeepc build.
Post a Comment