

Lets review the basics: firstly, what is tethering and Adhoc WiFi? Tethering is basically the sharing of internet connection of an internet capable device(host) with other devices(clients).
The host device usually have internet connection from some kind of data plan such as 3G, 4G, and/or Edge. Obviously, it would be a waste of money to purchase data plans for every device that you own.
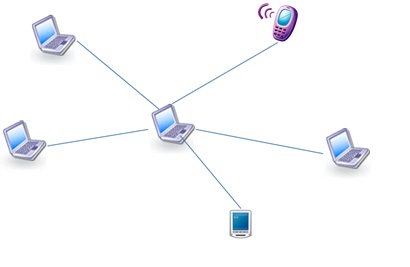
To share the internet connection, the host device would create a sort of "hot spot" to build a virtual network through WiFi. One of those type networks is the Wireless Ad-hoc Network.

Skipping the technical details of an adhoc network, just remember that it is not the same as a traditional WiFi network and cannot use the same protocol for connection. While all Android devices are capable of connecting to standard WiFi networks, there are many devices that lacks the ability to connect to Adhoc wireless networks(i.e. most Android tablets cannot do this unless a custom ROM is installed).
Luckily you can enable Adhoc WiFi by following the steps below.
How to enable Adhoc WiFi on Android Tablets and Phones using an App
Arend has released the "WiFI Ad Hoc Enabler" app on the market that automatically does the manual operation below. I highly recommend trying this app first.
Requirements:
-Root
-Busybox(Extra software that is installed on your Android to give you some additional handy LINUX / UNIX based commands. BusyBox is required by many apps)
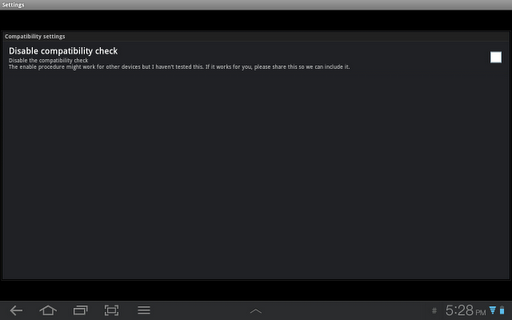
-May need to disable "Compatibility checker"(open the "Ad Hoc Enable" -> go to Settings.
How to enable Adhoc WiFi on Android Tablets and Phones Manually
Requirements:
- Root
- USB Drivers
- adb session
- Tethering(For the device creating the Adhoc network)
Instructions:
1) Download and Unzip adhoctablets.zip (I downloaded/unzipped to the C:\adhoctablets folder). Now transfer the folder(C:\adhoctablets) to the MicroSD card or somewhere else on the Android Device.
Note: You may need a wpa_supplicant specifically designed for your device! The one in the adhoctablets.zip is not for everyone*
2) Make sure the drivers for your Android device is installed(read requirement at top).
3) Go into Settings => Applications => Development => Check USB Debugging
4) On Windows/Linux/Mac open command prompt
Windows users can open cmd prompt by:
- Pressing WindowsKey+r then type in cmd and press "ok"
OR
- Type %windir%\system32\cmd.exe in any window in the address area
Linux Users:
You should know how this is done already...
5) In the command prompt browse to the adhoctablets.zip.
In Windows type:
cd \adhoctablets
6) Create an adb shell session
Windows: adb shell
Linux: adb-linux shell
Mac: adb-mac shell
7) Type the following:
su
mount -o rw,remount -t yaffs2 /dev/block/mtdblock3 /system
cp /system/bin/wpa_supplicant /sdcard/wpa_supplicant.original
cp /sdcard/wpa_supplicant /system/bin/.
chmod 755 /system/bin/wpa_supplicant
chown system.wifi /data/misc/wifi/wpa_supplicant.conf
exit
Note for last command: if *.conf file is not in /data/misc/wifi/ put the path to the right directory. You may need to use a program like ES File Explorer to locate the file directly.
8) Reboot the Android device
9) Done
Congratulations! Now the device is capable of connecting to any adhoc wireless network.
Note: If you ever want to revert back - type the following:
su
mount -o rw,remount -t yaffs2 /dev/block/mtdblock3 /system
cp /sdcard/wpa_supplicant.original /system/bin/.
chmod 755 /system/bin/wpa_supplicant
chown system.wifi /data/misc/wifi/wpa_supplicant.conf
exit
The host device usually have internet connection from some kind of data plan such as 3G, 4G, and/or Edge. Obviously, it would be a waste of money to purchase data plans for every device that you own.
To share the internet connection, the host device would create a sort of "hot spot" to build a virtual network through WiFi. One of those type networks is the Wireless Ad-hoc Network.
Skipping the technical details of an adhoc network, just remember that it is not the same as a traditional WiFi network and cannot use the same protocol for connection. While all Android devices are capable of connecting to standard WiFi networks, there are many devices that lacks the ability to connect to Adhoc wireless networks(i.e. most Android tablets cannot do this unless a custom ROM is installed).
Luckily you can enable Adhoc WiFi by following the steps below.
How to enable Adhoc WiFi on Android Tablets and Phones using an App
Arend has released the "WiFI Ad Hoc Enabler" app on the market that automatically does the manual operation below. I highly recommend trying this app first.
Requirements:
-Root
-Busybox(Extra software that is installed on your Android to give you some additional handy LINUX / UNIX based commands. BusyBox is required by many apps)
-May need to disable "Compatibility checker"(open the "Ad Hoc Enable" -> go to Settings.

How to enable Adhoc WiFi on Android Tablets and Phones Manually
Requirements:
- Root
- USB Drivers
- adb session
- Tethering(For the device creating the Adhoc network)
Instructions:
1) Download and Unzip adhoctablets.zip (I downloaded/unzipped to the C:\adhoctablets folder). Now transfer the folder(C:\adhoctablets) to the MicroSD card
Note: You may need a wpa_supplicant specifically designed for your device! The one in the adhoctablets.zip is not for everyone*
2) Make sure the drivers for your Android device is installed(read requirement at top).
3) Go into Settings => Applications => Development => Check USB Debugging
4) On Windows/Linux/Mac open command prompt
Windows users can open cmd prompt by:
- Pressing WindowsKey+r then type in cmd and press "ok"
OR
- Type %windir%\system32\cmd.exe in any window in the address area
Linux Users:
You should know how this is done already...
5) In the command prompt browse to the adhoctablets.zip.
In Windows type:
cd \adhoctablets
6) Create an adb shell session
Windows: adb shell
Linux: adb-linux shell
Mac: adb-mac shell
7) Type the following:
su
mount -o rw,remount -t yaffs2 /dev/block/mtdblock3 /system
cp /system/bin/wpa_supplicant /sdcard/wpa_supplicant.original
cp /sdcard/wpa_supplicant /system/bin/.
chmod 755 /system/bin/wpa_supplicant
chown system.wifi /data/misc/wifi/wpa_supplicant.conf
exit
Note for last command: if *.conf file is not in /data/misc/wifi/ put the path to the right directory. You may need to use a program like ES File Explorer to locate the file directly.
8) Reboot the Android device
9) Done
Congratulations! Now the device is capable of connecting to any adhoc wireless network.
Note: If you ever want to revert back - type the following:
su
mount -o rw,remount -t yaffs2 /dev/block/mtdblock3 /system
cp /sdcard/wpa_supplicant.original /system/bin/.
chmod 755 /system/bin/wpa_supplicant
chown system.wifi /data/misc/wifi/wpa_supplicant.conf
exit


17 comments:
Does this replace the standard wifi connectivity or does it add to the functionality? i.e. can I still connect to standard access point if I need to?
@will
Yes, it adds that ability without removing anything else
This procedure broke my wifi on my Droid Bionic and I had to revert back to fix it.
Also a new indicator has appeared, an empty rectangular box with squiggly lines on each side.
Oh, that was a vibrate mode icon and was unrelated
I can't complete procedure as your recommend. I have attached screen caption. Please help step by step. I'm new for android.
Sorry I can paste. But I still stagnant at step 5. Please give me more explain how to complete.
@MisterX
step 5 needs you to navigate to the adhoctablets file that you downloaded, i.e. if you unzipped the file to c; drive type in cd c:\adhoctablets
Big thank, I got it. BUT I face a big trouble after did it. I can't turn on wifi cause of I try to paste file wpa-suplicant no back up file. Could you recommend me how to fix it back? I try to factory re-set it still remain can't turn on wifi.
Please help
@MisterX
If you followed the commands correctly, there should be a copy of the original on the sdcard. Use the commands in the Note section and it will revert back. If for some reason you don't have it then you will need to reflash the original ROM
Can you give the original wpa-suplicant file? Please
@MisterX
You would want the original for your specific device.
Big thank sir. I can provide as I can below.
Kernel 2.6.35.7
Model : EM73_SIS_GC2M_V2
Android 2.3.3
Or
you give me the useful related link for my DIY.
However big thank for your help anyway.
I tried the steps but I was denied superuser. with the 'su' command, i get a permission denied. Any workaround for this. Thanks.
@John
You u need root on device....
Hello
Great instructions, thank you.
A few questions if you don't mind.
I got the message saying that /sdcard/wpa_supplicant didn't exist to copy it to the /system/bin/ directory, so I copied the one in the zip file to the sdcard so the system would use that one. Did I mess up there?
Also, I didn't have /data/misc/wifi/wpa_supplicant.conf after root explorer found it, it was in the /etc/ directory, so I copied it to the location you mentioned. Did I mess up there again?
Because after I did all that the wifi would no find any network, adhoc or infrastructure. I had to revert. But it didn't work, it won't connect now either, so now my poor tablet won't connect to anything. I have froyo
Hi,
I am using dell streak 5(mini tab), i tried the same, but couldnt see adhoc networks in list.
More over its not showing up usual wifi networks too.Earlier I used to connect to my wifi in office, after this changes, its not connecting. Normal access points are also not listing up.
Please help me how can i revert back to my older settings,I tried with revert back code, but its not working.
@Sudha Ar
The path of your files were not in the typical places, so it did not make a copy of the original. Your best bet is either to find the wpa_supplicant file from another website for your dell streak and hope it works(read the notes above)... or you can do a full reset it would revert back. I highly stress anyone reading this that if the back up did not work, then the files are not in the right place!
Post a Comment